What's the Easiest Way to Make Ice Cream at Home Without a Machine?
Ice cream is a universal delight, especially on hot summer days. But what if you don't have an ice cream maker? Don't worry! There are simple and innovative ways to prepare delicious homemade ice cream without specialized equipment. In this article, we will explore the easiest and most effective methods for making ice cream at home, focusing on the essential ingredients and techniques that guarantee a creamy and satisfying result.
Chapter 1: Basics of Homemade Ice Cream
Before we start exploring different methods, it's important to understand the basic ingredients that make ice cream delicious and creamy. These ingredients work together to create the perfect texture and rich flavor we expect from ice cream.
Essential Ingredients:
- Milk and Cream: They form the fatty base that gives ice cream its creamy texture. It is preferable to use heavy cream (at least 35% fat) for best results.
- Sugar: Adds sweetness and helps prevent the formation of large ice crystals, contributing to a smooth texture.
- Eggs (Optional): Used in some recipes to add more creaminess and richness.
- Flavors: Can be anything from vanilla and chocolate to fruits and nuts.
Tips for Successful Preparation:
- Use High-Quality Ingredients: The better the ingredients, the better the ice cream.
- Chill Ingredients Well: This helps the ice cream freeze faster and more evenly.
- Don't Overmix: Overmixing can make the ice cream sticky.
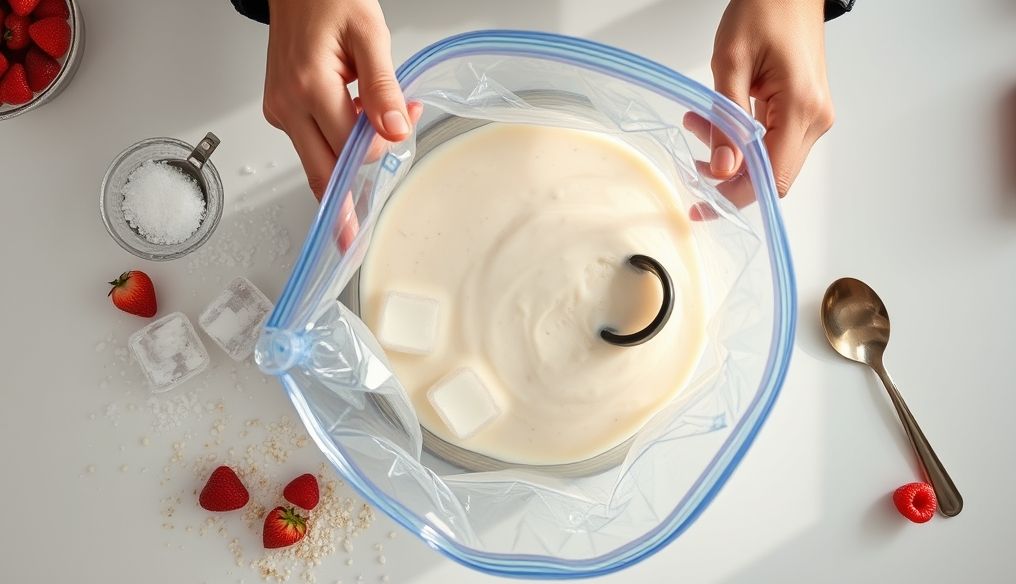
Chapter 2: The Double Bag Method
This method is easy and fun, and is ideal for children and adults alike. It requires few equipment and produces quick and delicious ice cream.
Ingredients:
- 1 cup heavy cream
- 1/2 cup milk
- 1/4 cup sugar
- 1/2 teaspoon vanilla extract
- 3 cups ice
- 1/2 cup coarse salt
Steps:
- Mix the cream, milk, sugar, and vanilla in a small, resealable plastic bag. Seal the bag tightly.
- Place the ice and salt in a large, resealable plastic bag.
- Place the small bag inside the large bag containing ice and salt.
- Shake the large bag vigorously for 10-15 minutes, or until the mixture in the small bag freezes.
- Enjoy homemade ice cream!
Why Do We Use Salt?
Adding salt to the ice lowers its freezing point, allowing the mixture in the small bag to freeze faster. This simple physical process is key to the success of this method.
Chapter 3: The Whisk and Freeze Method
This method relies on vigorously whisking the ingredients to incorporate air, then freezing them in stages with constant stirring to achieve a creamy texture.
Ingredients:
- 2 cups heavy cream, chilled
- 1 can sweetened condensed milk
- Favorite flavor (such as vanilla extract, cocoa powder, or fruit puree)
Steps:
- Whip the heavy cream in a large bowl using an electric mixer until stiff peaks form.
- Add the sweetened condensed milk and your favorite flavor. Mix gently until combined.
- Pour the mixture into a freezer-safe container.
- Place the container in the freezer for 2-3 hours.
- Remove the container from the freezer and stir the mixture well with a fork or spoon.
- Return the container to the freezer for another 2-3 hours. Repeat the stirring process every hour to achieve a creamy texture.
- Leave the ice cream in the freezer until completely frozen.
Additional Tips:
- You can add pieces of chocolate, nuts, or dried fruits after the first stirring.
- For best results, use a metal container to freeze the ice cream.
Chapter 4: The Frozen Yogurt Method
This method is healthy and refreshing, and is a great alternative to traditional ice cream. Yogurt adds a nice acidic flavor and a creamy texture.
Ingredients:
- 2 cups full-fat Greek yogurt
- 1/2 cup honey or maple syrup
- 1 teaspoon lemon juice
- Favorite fruits (such as strawberries, blueberries, or mangoes)
Steps:
- Mix the yogurt, honey, and lemon juice in a bowl.
- Add the chopped fruits. Mix gently.
- Pour the mixture into a freezer-safe container.
- Place the container in the freezer for 3-4 hours.
- Remove the container from the freezer and stir the mixture well every hour to achieve a smooth texture.
- Leave the frozen yogurt in the freezer until completely frozen.
Benefits of Frozen Yogurt:
- Rich in protein and calcium.
- Contains probiotics beneficial for digestive health.
- Lower in calories and fat compared to traditional ice cream.
Chapter 5: The Vegan Ice Cream Method
If you follow a vegan diet or are allergic to dairy products, you can still enjoy homemade ice cream. There are many plant-based alternatives that can be used to make delicious and creamy ice cream.
Ingredients:
- 2 cups full-fat coconut milk, chilled
- 1/2 cup sugar
- 1/4 cup maple syrup
- 1 teaspoon vanilla extract
- Pinch of salt
Steps:
- Mix the coconut milk, sugar, maple syrup, vanilla, and salt in a bowl.
- Pour the mixture into a freezer-safe container.
- Place the container in the freezer for 4-5 hours.
- Remove the container from the freezer and stir the mixture well every hour to achieve a smooth texture.
- Leave the vegan ice cream in the freezer until completely frozen.
Other Alternatives:
- Almond milk, soy milk, or cashew milk can be used instead of coconut milk.
- Mashed avocado can be added to add more creaminess.
Chapter 6: Tips for Achieving a Creamy Texture
One of the biggest challenges in making ice cream without a machine is achieving a creamy texture. Here are some tips that can help you achieve that:
- Regular Stirring: Constant stirring during freezing prevents the formation of large ice crystals.
- Adding Alcohol: A small amount of alcohol (such as vodka or rum) can help prevent the ice cream from freezing completely, making it softer.
- Using Natural Stabilizers: A small amount of cornstarch or gelatin can be added to add more texture.
- Pre-cooling: Make sure to cool all ingredients and containers before starting the preparation.
Chapter 7: Innovative Flavor Ideas
Now that you know how to make ice cream without a machine, it's time to experiment with new and innovative flavors. Here are some ideas that can inspire you:
- Coffee Ice Cream: Add coffee extract or ground coffee to the ice cream mixture.
- Mint Chocolate Ice Cream: Add mint extract and small chocolate chips.
- Salted Caramel Ice Cream: Add caramel sauce and a pinch of salt.
- Lemon Basil Ice Cream: Add lemon juice and chopped basil leaves.
- Lavender Honey Ice Cream: Add lavender extract and honey.
Chapter 8: Storing Homemade Ice Cream
After preparing the delicious ice cream, it is important to store it properly to maintain its quality. Here are some tips:
- Use an Airtight Container: This prevents the formation of ice crystals on the surface of the ice cream.
- Place the Ice Cream in the Deepest Part of the Freezer: This part is the coldest and most temperature-stable.
- Cover the Surface of the Ice Cream with Parchment Paper or Plastic Wrap: This prevents the formation of an icy crust.
- Consume the Ice Cream Within Two Weeks: This ensures the best flavor and texture.
Chapter 9: Common Problems and Solutions
You may encounter some problems when making ice cream without a machine. Here are some common problems and their solutions:
- The Ice Cream is Too Frozen: Leave it at room temperature for a few minutes before serving.
- The Ice Cream Contains Ice Crystals: Reduce the amount of sugar or add a small amount of alcohol.
- The Ice Cream is Not Creamy Enough: Use heavy cream with a high fat content or add egg yolks.
- The Ice Cream Melts Too Quickly: Make sure to cool all ingredients and containers well before starting the preparation.
Chapter 10: Conclusion
Making ice cream at home without a machine is easier than you think. Using the basic ingredients and simple techniques we explored in this article, you can enjoy creamy and delicious ice cream anytime. Whether you prefer the quick double bag method, the more traditional whisk and freeze method, or even the healthy frozen yogurt method, there is a method to suit your taste and budget. Feel free to experiment with new and innovative flavors, and enjoy making your own ice cream!